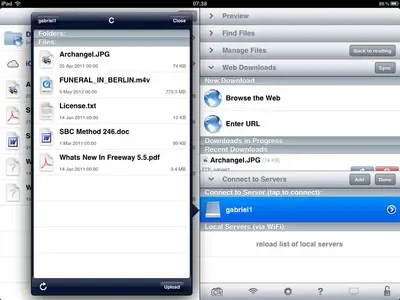
Gabriel1
iPF Noob
I have just received my new CloudFTP. What is CloudFTP I hear you ask? Well, it's a device which will set up a local wireless network to be able to connect a PC/Mac, iOS devices and android devices to USB Mass Storage devices including flash drives, External HD's, cameras, etc.
So, where to start.......how about, what does it look like, well here it is......
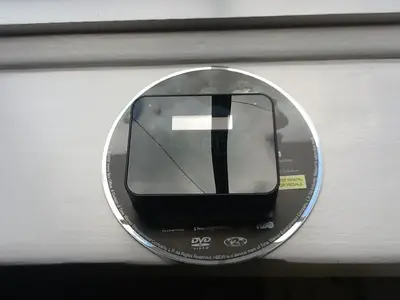
To give you an idea of size I put it on a DVD......so yes, it's tiny!!
It comes with a USB power adaptor lead so that you can charge it from your computer or even the same charging adaptor that comes with your iPad/iPhone.
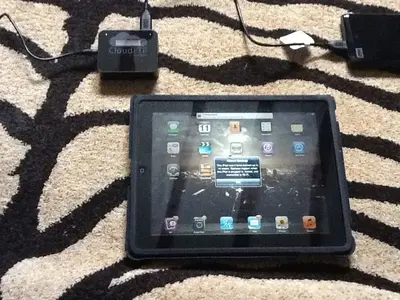
How easy is it to get going I hear you ask? You did ask didn't you? Well, really easy is the answer. First off I fired up a WD Passport and threw some files on it, then I plugged the CloudFTP into my MacBook Air (purely because it may not have had enough charge for this quick exercise) and connected my WD Passport to the one USB port (note that you can use a USB hub with the CloudFTP so multiple device connection shouldn't be a problem and I will try this in the not to distant future) then fired up my iPad 1 as I needed my iPad 2 to take the pictures.......so here is that setup.......
I then switched on the CloudFTP which provided the power for the WD Passport. It took no more than a few seconds to power up so my next step was to go into Settings>wifi and select "Hyperdrive" (in the slim instruction manual it says that it will be called "CloudFTP" but it's not hard to figure out the correct network). Then open Safari and type in http://192.168.0.1 and hey presto......
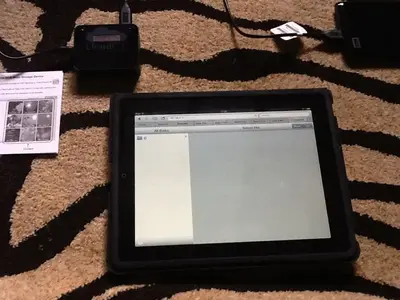
Now, click on the drive name in the left hand window and.......
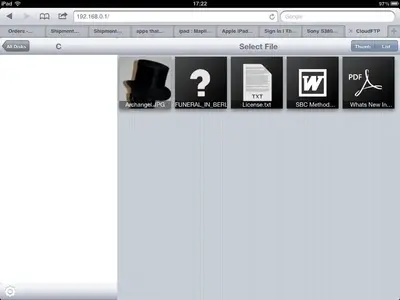
And as a final test I opened a few docs which all opened in Safari. Here is a movie opening (it took around 1 to 2 seconds to start playing).......

So far so good. This is the start of this guide and I will update as I learn more about what this wee beauty can do but I am already impressed with the ease of setup. The whole process took about 30 seconds and took much longer to type!
Now I'll start reading, testing (playing) and reporting back but first a few facts and figures......
The box claims that it can back up your USB data with popular online cloud storage services, stream 3 different movies with up to 3 different devices at the same time (good for long car journeys with all the passengers watching their own movies and share documents with up to 8 people
So what is inside this mysterious black box, well here goes......
ARM926EJ-S RISC Core processor
150MHZ 64MB DDR SDRAM, 30MHZ 16MB SPI NOR Flash
2600mAh 18650 Li-Ion battery ( up to 5 hours)
Powered USB 2 port
HTML5 web browser based
Supported file systems FAT32, NTFS, HFS, HFS+, exFAT, EXT 2/3/4
Supports wifi 802.11b/g/n "Access Point" and "Infrastructure" mode
Watch this space for further updates as I test it and hopefully don't break it!
CHANGING NAME AND SETTINGS
So here we are with the first update, less of a review this time, more of a tip/guide.
When you first use the CloudFTP it will not be password protected which means anyone who types in the URL http://192.168.0.1 can access all of your goodies, which is kind of bad. So, let's get some kind of protection going and whilst we are about it let's change it's name from hyperdrive to something else.
Before we start you probably want to know how easy this s going to be, well, can you turn on a tap? Did you say yes! Well in that case I think you are good to go!
Firstly, connect to your CloudFTP as described above.
Next we need to enter the settings page.......
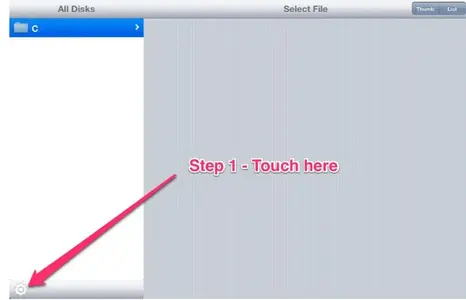
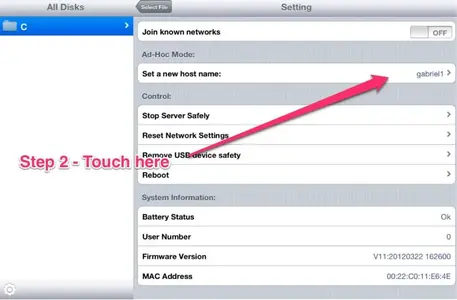
When in settings we need to access the page which allows us to change the device name and add a password (note that I have already changed the device (network) name as I went through the process before putting the guide together, just to make sure that it works).......
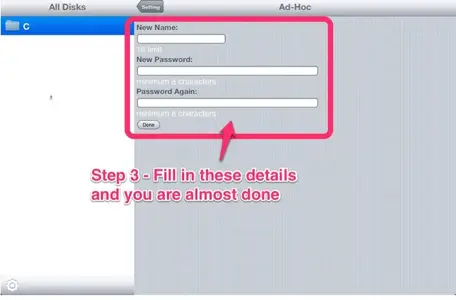
Now fill in your new details and when you are happy, touch the done button..........
Finally, go to your Settings App and click on the Wifi tab and you should find your device........
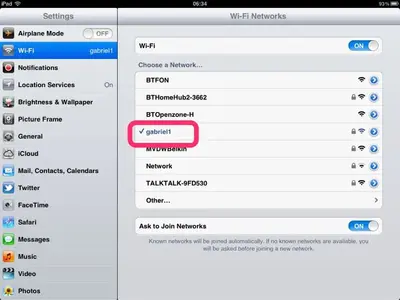
This time around it will ask you for your password.
Now, that was simple and easy.........but don't forget to turn off the tap, we don't want you to flood your house!! That would be bad!
UPLOADING (USING GOODREADER)
As promised we can now look at the most important aspect, saving files from the iPad to an external HD, always the most underachieved aspect of most external storage options and definitely the most desirable!
So we start off with the web interface to demonstrate the files which were on the external HD at the start of this exercise.......
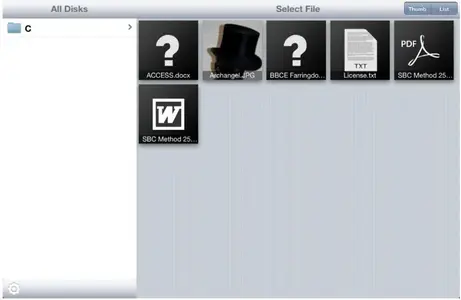
Now we need to open GoodReader and tap on the drive name in the right hand column......
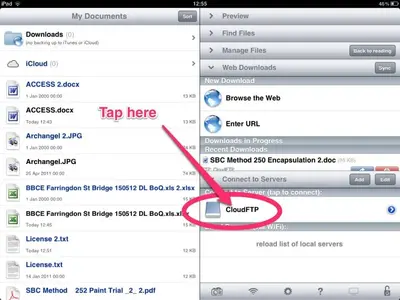
This opens the CloudFTP in the left hand side of the screen, now we tap on "upload"........
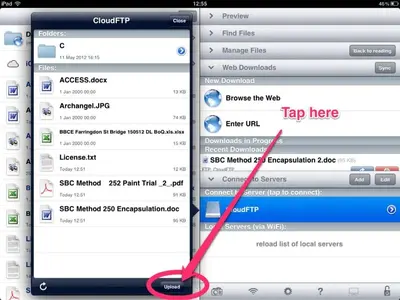
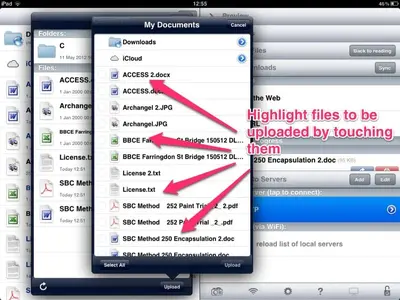
A list of files in GoodReader appears on top, touch the files to select for uploading......
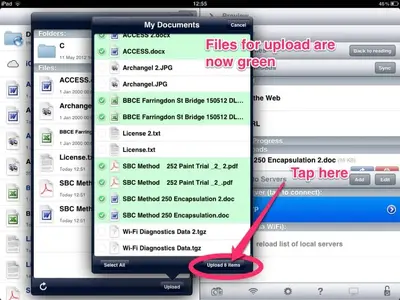
The selected files are highlighted in a fetching green colour so it's time to hit the "upload" button.......
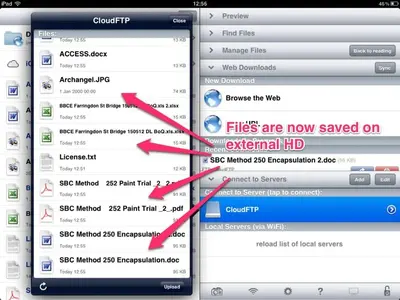
And hey presto, here are the files on your external drive (note that when upload is pressed it checks if files with the same name exist on the external HD and gives you the option to overwrite or not overwrite, so you have complete control)........
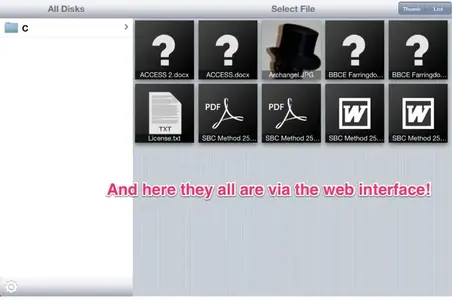
And just to prove that they have uploaded, here they are on the web interface (in case you are wondering why there are not the original files plus the eight uploaded, I chose to overwrite hence eight files)......
This whole exercise to upload eight files took around 20 seconds from start to finish, so it really is very simple!
CONNECTING TO GOODREADER
I should really have put this before the previous section but hey, my mind works in mysterious ways!
Connecting to GoodReader couldn't be easier, first of all, open GoodReader and touch "add" in connect to server........
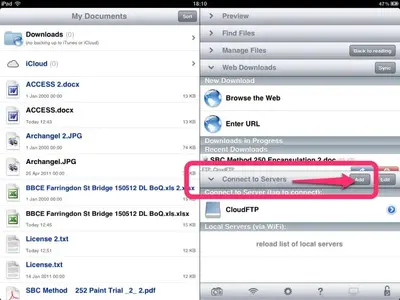
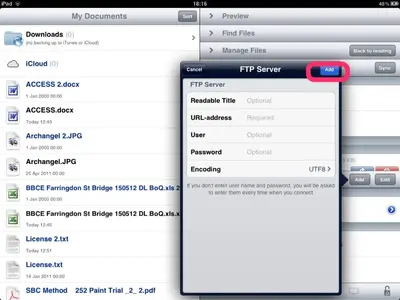
Then you will get a form like this (in the first image), populate it with the details in the second image then tap the "add" button......
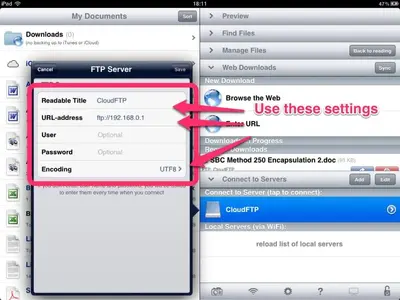
Now all you need to do is tap the icon in this window to view the contents of your drive.......
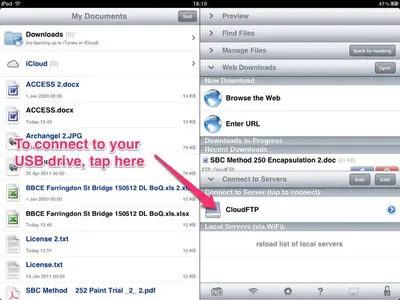
And that is all it takes!!
The Archangel
So, where to start.......how about, what does it look like, well here it is......

To give you an idea of size I put it on a DVD......so yes, it's tiny!!
It comes with a USB power adaptor lead so that you can charge it from your computer or even the same charging adaptor that comes with your iPad/iPhone.
How easy is it to get going I hear you ask? You did ask didn't you? Well, really easy is the answer. First off I fired up a WD Passport and threw some files on it, then I plugged the CloudFTP into my MacBook Air (purely because it may not have had enough charge for this quick exercise) and connected my WD Passport to the one USB port (note that you can use a USB hub with the CloudFTP so multiple device connection shouldn't be a problem and I will try this in the not to distant future) then fired up my iPad 1 as I needed my iPad 2 to take the pictures.......so here is that setup.......

I then switched on the CloudFTP which provided the power for the WD Passport. It took no more than a few seconds to power up so my next step was to go into Settings>wifi and select "Hyperdrive" (in the slim instruction manual it says that it will be called "CloudFTP" but it's not hard to figure out the correct network). Then open Safari and type in http://192.168.0.1 and hey presto......

Now, click on the drive name in the left hand window and.......

And as a final test I opened a few docs which all opened in Safari. Here is a movie opening (it took around 1 to 2 seconds to start playing).......

So far so good. This is the start of this guide and I will update as I learn more about what this wee beauty can do but I am already impressed with the ease of setup. The whole process took about 30 seconds and took much longer to type!
Now I'll start reading, testing (playing) and reporting back but first a few facts and figures......
The box claims that it can back up your USB data with popular online cloud storage services, stream 3 different movies with up to 3 different devices at the same time (good for long car journeys with all the passengers watching their own movies and share documents with up to 8 people
So what is inside this mysterious black box, well here goes......
ARM926EJ-S RISC Core processor
150MHZ 64MB DDR SDRAM, 30MHZ 16MB SPI NOR Flash
2600mAh 18650 Li-Ion battery ( up to 5 hours)
Powered USB 2 port
HTML5 web browser based
Supported file systems FAT32, NTFS, HFS, HFS+, exFAT, EXT 2/3/4
Supports wifi 802.11b/g/n "Access Point" and "Infrastructure" mode
Watch this space for further updates as I test it and hopefully don't break it!
CHANGING NAME AND SETTINGS
So here we are with the first update, less of a review this time, more of a tip/guide.
When you first use the CloudFTP it will not be password protected which means anyone who types in the URL http://192.168.0.1 can access all of your goodies, which is kind of bad. So, let's get some kind of protection going and whilst we are about it let's change it's name from hyperdrive to something else.
Before we start you probably want to know how easy this s going to be, well, can you turn on a tap? Did you say yes! Well in that case I think you are good to go!
Firstly, connect to your CloudFTP as described above.
Next we need to enter the settings page.......

When in settings we need to access the page which allows us to change the device name and add a password (note that I have already changed the device (network) name as I went through the process before putting the guide together, just to make sure that it works).......

Now fill in your new details and when you are happy, touch the done button..........

Finally, go to your Settings App and click on the Wifi tab and you should find your device........

This time around it will ask you for your password.
Now, that was simple and easy.........but don't forget to turn off the tap, we don't want you to flood your house!! That would be bad!
UPLOADING (USING GOODREADER)
As promised we can now look at the most important aspect, saving files from the iPad to an external HD, always the most underachieved aspect of most external storage options and definitely the most desirable!
So we start off with the web interface to demonstrate the files which were on the external HD at the start of this exercise.......

Now we need to open GoodReader and tap on the drive name in the right hand column......

This opens the CloudFTP in the left hand side of the screen, now we tap on "upload"........

A list of files in GoodReader appears on top, touch the files to select for uploading......

The selected files are highlighted in a fetching green colour so it's time to hit the "upload" button.......

And hey presto, here are the files on your external drive (note that when upload is pressed it checks if files with the same name exist on the external HD and gives you the option to overwrite or not overwrite, so you have complete control)........

And just to prove that they have uploaded, here they are on the web interface (in case you are wondering why there are not the original files plus the eight uploaded, I chose to overwrite hence eight files)......

This whole exercise to upload eight files took around 20 seconds from start to finish, so it really is very simple!
CONNECTING TO GOODREADER
I should really have put this before the previous section but hey, my mind works in mysterious ways!
Connecting to GoodReader couldn't be easier, first of all, open GoodReader and touch "add" in connect to server........

Then you will get a form like this (in the first image), populate it with the details in the second image then tap the "add" button......


Now all you need to do is tap the icon in this window to view the contents of your drive.......

And that is all it takes!!
The Archangel
Last edited:

