Welcome to the iPadForums.new tutorial on restoring your iPad using TinyUmbrella and saved SHSH Blobs. If you need a quick refresher on what SHSH Blobs are, review our FAQ here - http://www.ipadforums.net/ipad-hacking/59291-shsh-blobs-faq-new-improved-2012-a.html
This guide will help you restore your iPad firmware to any version of IOS before 5.0 provided you have SHSH Blobs saved for your device and that version of iOS, either locally on your PC via TinyUmbrella, or remotely stored on Saurik's Cydia server. Whichever firmware you intend to restore, you should have a downloaded copy available on your PC. You can download the right firmware for your device from our sticky thread here - http://www.ipadforums.net/ipad-hacking/24939-official-apple-ios-firmware-download-links-ipad.html
If you are using Windows and Internet Explorer, make sure you rename the file back to have an extension of IPSW if it gets renamed with ZIP. This is a fault of Windows and IE, and nothing to do with Apple! You could also consider using a better browser such as Chrome or Firefox to avoid this issue altogether...
Remember - without saved SHSH Blobs for the firmware you want to restore there is no way to restore it on your device. If you don't have them then sorry, you are out of luck
± This tutorial is confirmed working for all models of iPad1 and the WiFi only model for iPad2 provided you have the correct blobs saved and you are restoring a firmware before 5.0! ±
How do I know if I have blobs saved?
If you have been jailbroken and have used Cydia, chances are it has saved your blobs for you. If you want to check now and have access to Cydia on your iPad, open it up and look at the top left of the home page. If there is a line starting "SHSH:" this tells you what blobs are saved for your device. Hopefully it says something useful like 4.3.3 which is the golden firmware for jailbreaking at the time of writing. The following snippet shows my saved blobs on Cydia...
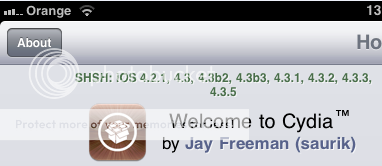
This means I can use these blobs to restore 4.2.1, 4.3, 4.3b2, 4.3b3, 4.3.1, 4.3.2, 4.3.3 and 4.3.5 any time I want. But how? Let me show you...
TinyUmbrella - Saving and Serving your blobs.
TU, as it will be know from here on in, is an application developed by semaphore (@notcom) to assist with both saving your SHSH Blobs locally on your PC and subsequently serving them up to iTunes rather than have them served up from Apple. The advantage to this is you can replay saved blobs and fool iTunes and your device into allowing you to restore a firmware which Apple is no longer signing.
This tutorial assumes you have never used TU before and your saved blobs are on Cydia, however it will work just as well if you have been using TU for a long time yourself. HOWEVER, I encourage everyone to follow the tutorial steps exactly as they have the added benefit of leaving both TU and your PC in the ideal configuration with which to save new blobs and avoid conflict with your hosts file or restoring stock firmware from iTunes. So again, I stress, everyone should follow all the steps at the beginning. It just helps get things straight...
First off, if you don't have it installed, you need to download the latest version from - The Firmware Umbrella - TinyUmbrella
The download is just an exe file for Windows and a dmg for OSX. TU requires Java, so if your PC does not have that installed you may also need to get that done...
Connect your iPad to your PC. If iTunes starts it is best to exit it immediately.
Now start TU and you should be presented with a screen similar to this...
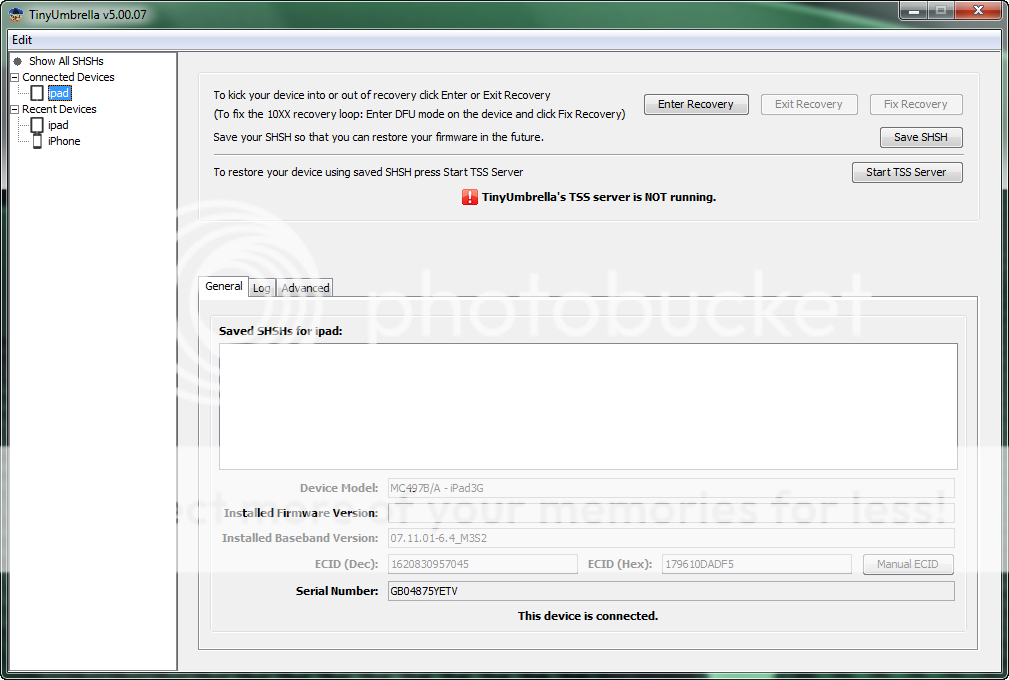
On the connected devices list to the left you should see your iPad. Click on it. The panel in the middle will list your SHSH Blobs which are saved locally on this PC. If this is truly the first time you have used TU you will have a blank list like the one above. Otherwise you will see the blobs you already have saved.
Next, we need to update the TU settings so it will first retrieve our saved blobs from Saurik's Cydia server. To do this press the "Advanced" tab and untick all the options except the two shown in the following screen...
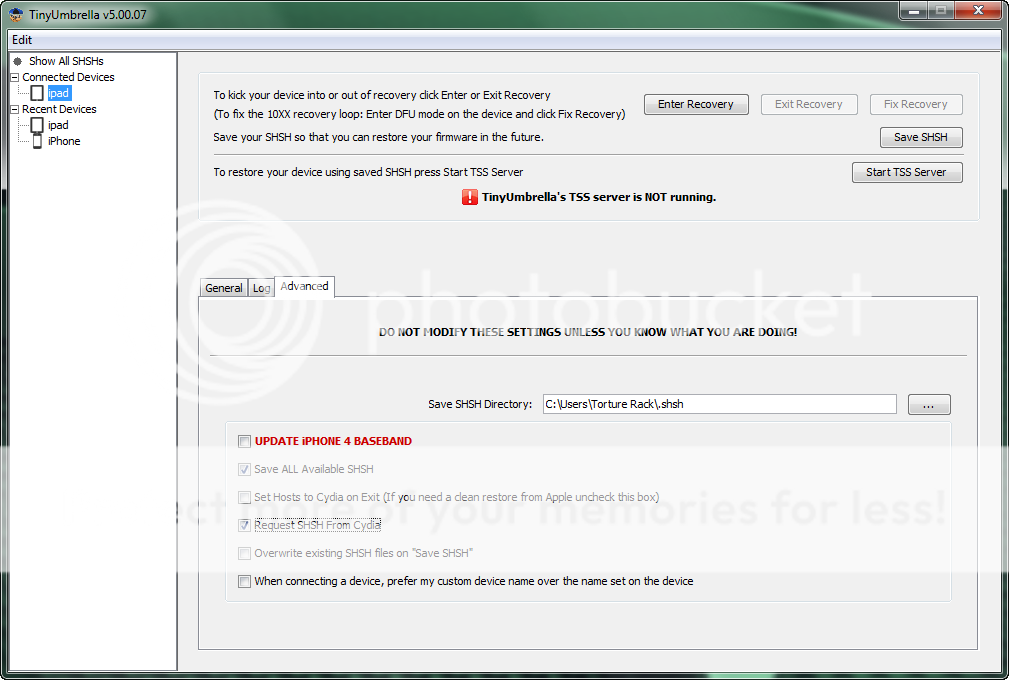
Now PRESS the "Save SHSH" button. You will see a spinner icon beside your iPad on the left. Wait till this finished then untick the "Request SHSH from Cydia" button so your screen looks like this...
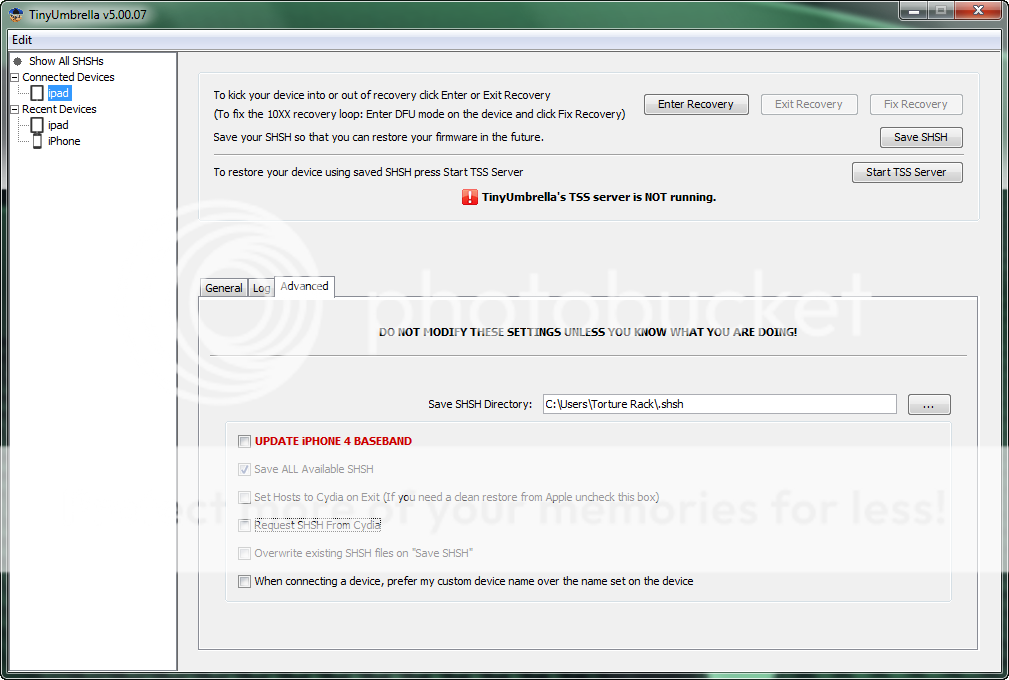
Now PRESS "Save SHSH" AGAIN. This time TU will retrieve the latest blobs directly from Apple servers. This will cover any situation where Cydia may not have the latest blobs. It is also the safest configuration to leave TU in once you are finished with it, so do not make any further changes to the check boxes.
Now is the time to press the "Start TSS Server" button. TU will make the necessary changes to your computer to fool iTunes into thinking that TU is the Apple blob server. Once it is started, switch back to the main screen by pressing the "General" tab and you should see your blobs as follows...
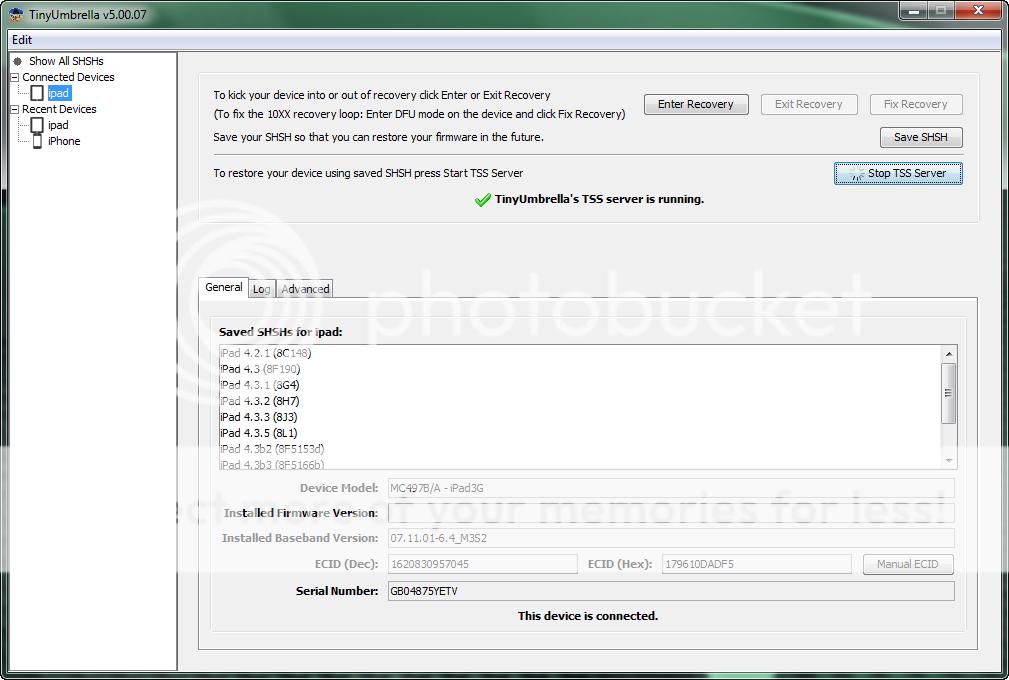
As you can see, the list which I showed right at the beginning of this tutorial, which were the blobs saved on Cydia, are now downloaded to TU and are ready for use.
The one I am most interested in is 4.3.3 as the rest of this tutorial will be based on restoring that version, despite 4.3.5 being the current firmware (at the time of writing).
For the time being, that is all we need to do with TU. It will work it's magic in the background now! You can minimise it if you like, just make sure you do not accidentally exit it! If you do, start it again and press "Start TSS Server".
Restoring a previous firmware.
So, now that TU is running in the background we are able to restore any firmware which is in the list of saved blobs which TU shows. For this example I am choosing 4.3.3 as this is the golden firmware for jailbreaking....
First it is always best to put your device into DFU Mode in preparation for a restore operation. To do this, it must be connected to the PC. You hold the home and power buttons at the same time for exactly 10 seconds then release the power button whilst continuing to hold home. After about 15 seconds the device will enter DFU mode and will be recognised by your PC. During this period you MUST let the drivers install correctly. Do not unplug the iPad from your PC. It just confuses Windows and sometimes it is a challenge to recover from a failed driver install. If you need more assistance in getting into DFU mode, try our sticky on the subject here - http://www.ipadforums.net/ipad-hacking/27489-dfu-mode-dummies.html
As soon as you achieve DFU mode, iTunes should start automatically. If it does not, start it up and you should be presented with the following screen...
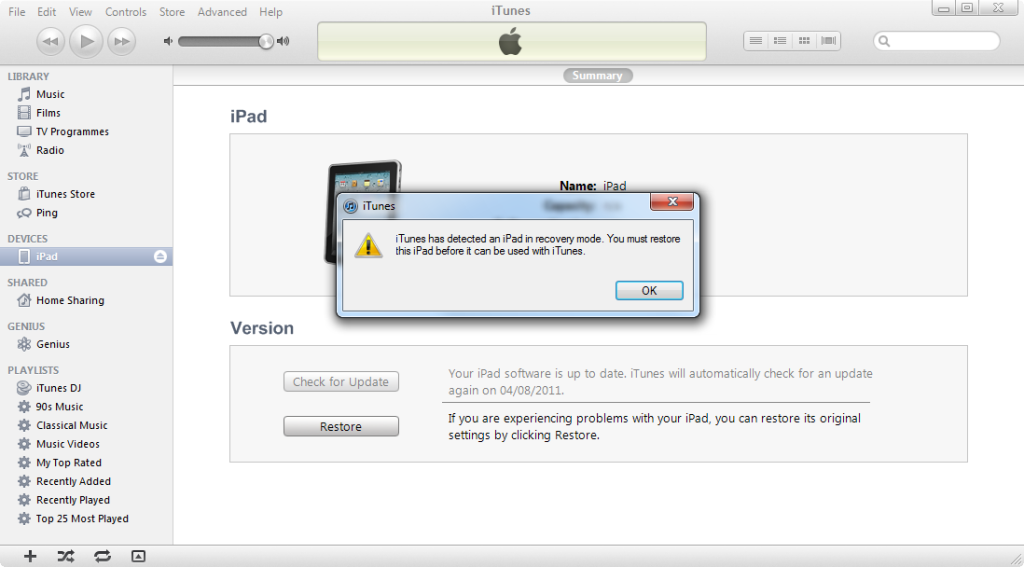
Dismiss the dialogue and then HOLD the shift key on your keyboard (option key on a Mac) and click the "Restore" button. This will prompt iTunes to ask you to provide a firmware file to restore. Navigate to the file you downloaded at the start of the tutorial (or already had prepared) as shown in the following screen...
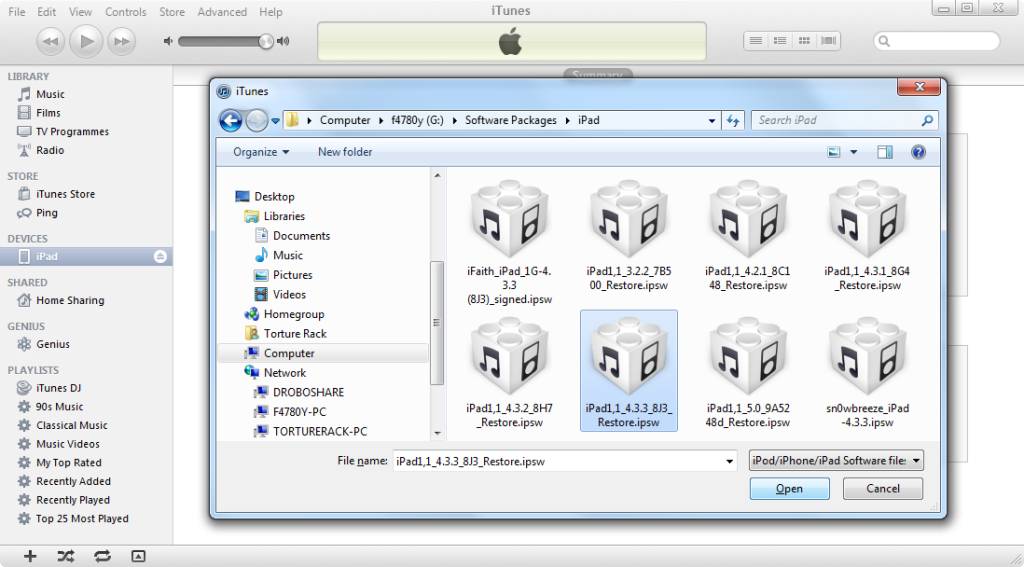
iTunes will give you a warning, which you should accept by pressing OK...
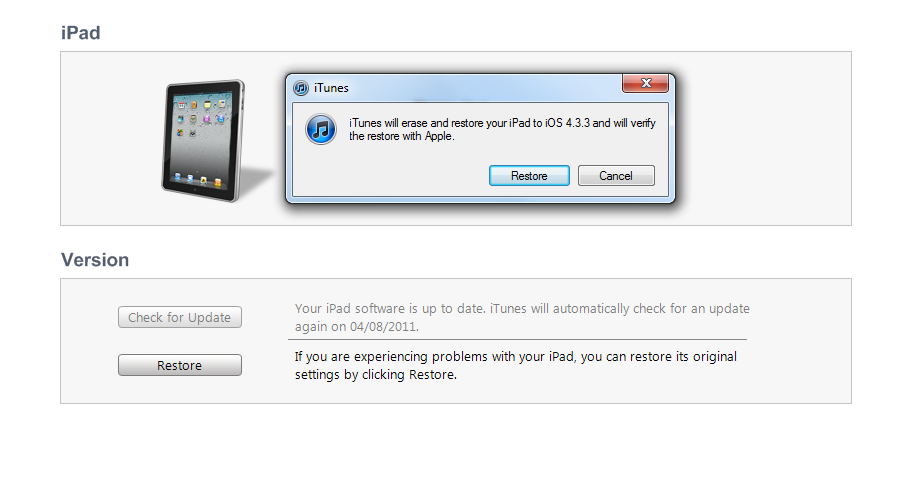
The rest of the process should be seamless if you have followed the set-up instructions... iTunes will go through a series of procedures one after the other...


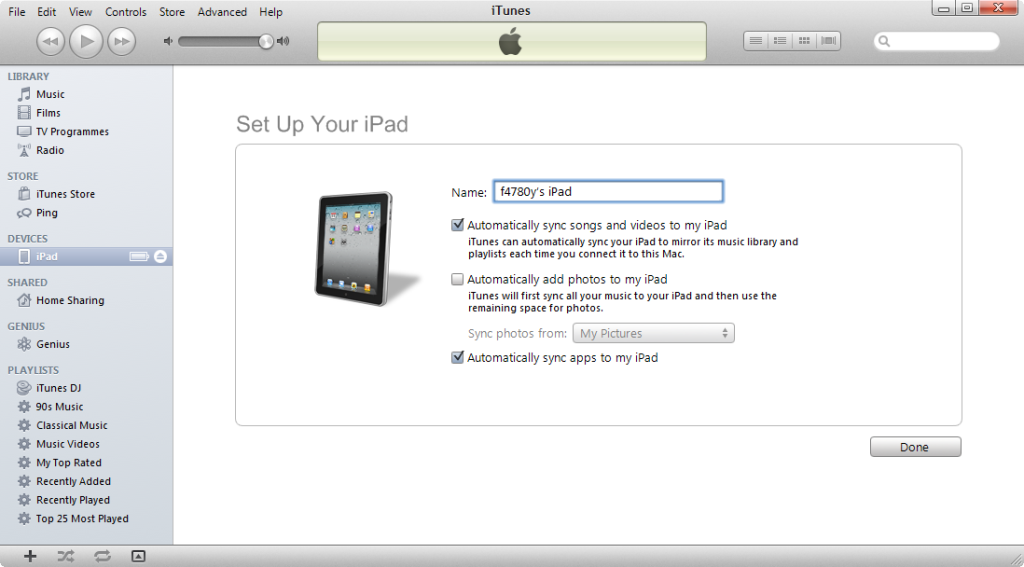
Finally, your iPad should reboot with the firmware of your choice freshly installed. It will still require an initial connection to iTunes as though it was just fresh from a new product unboxing, and after that you should see your iPad in iTunes to use like so...
That's It! You (hopefully) successfully restored your iPad.
Now you can exit TU. It's work is done. I mentioned earlier that the options we set are the ideal configuarion for TU and your PC. Why? Well when you exit TU now, your hosts file will be pointing as it should back to Apple, so if you ever want to install the latest and greatest firmware, you won't have a problem. You never need to edit your hosts configuration manually if you are going to use TU in this configuration from now on. Also, whenever Apple releases a new firmware, just start TU (there is no need to connect any device to it) click "Show All SHSHs" in the top left and then press "Save ALL SHSHs" in the top right. TU will then save the latest blobs from Apple for all your devices. Simple and effective!
Wait! I got an error!
If you happened to receive an error, such as an iTunes 1013, this indicates you have a 3G device and your baseband is out of sync with the version you are trying to install. The baseband of the 3G iPads have blobs too, however these use stronger security techniques that the standard IOS SHSH Blobs, so they cannot be saved and replayed. If you run into trouble, post a reply details of which iPad you have, which firmware you were trying to restore from and to, and if you can also post the version of your baseband, which can be found by going to General > Settings > About, and scrolling to the bottom where the heading is "Modem Firmware".
And remember you must use at least 5.00.08 of TU!
This guide will help you restore your iPad firmware to any version of IOS before 5.0 provided you have SHSH Blobs saved for your device and that version of iOS, either locally on your PC via TinyUmbrella, or remotely stored on Saurik's Cydia server. Whichever firmware you intend to restore, you should have a downloaded copy available on your PC. You can download the right firmware for your device from our sticky thread here - http://www.ipadforums.net/ipad-hacking/24939-official-apple-ios-firmware-download-links-ipad.html
If you are using Windows and Internet Explorer, make sure you rename the file back to have an extension of IPSW if it gets renamed with ZIP. This is a fault of Windows and IE, and nothing to do with Apple! You could also consider using a better browser such as Chrome or Firefox to avoid this issue altogether...
Remember - without saved SHSH Blobs for the firmware you want to restore there is no way to restore it on your device. If you don't have them then sorry, you are out of luck
± This tutorial is confirmed working for all models of iPad1 and the WiFi only model for iPad2 provided you have the correct blobs saved and you are restoring a firmware before 5.0! ±
iPad2 3G Owners: Please note - with the release of IOS5 and now that Apple has stopped signing the 4.3.5 firmware, it is no longer possible for you to use your saved blobs to restore a previous version of the firmware using this method. Please review our tutorial on using TinyCFW to see if you are covered by that! Do not attempt to restore your iPad2 3G back to a 4.x firmware using TU. It will fail!
How do I know if I have blobs saved?
If you have been jailbroken and have used Cydia, chances are it has saved your blobs for you. If you want to check now and have access to Cydia on your iPad, open it up and look at the top left of the home page. If there is a line starting "SHSH:" this tells you what blobs are saved for your device. Hopefully it says something useful like 4.3.3 which is the golden firmware for jailbreaking at the time of writing. The following snippet shows my saved blobs on Cydia...

This means I can use these blobs to restore 4.2.1, 4.3, 4.3b2, 4.3b3, 4.3.1, 4.3.2, 4.3.3 and 4.3.5 any time I want. But how? Let me show you...
TinyUmbrella - Saving and Serving your blobs.
TU, as it will be know from here on in, is an application developed by semaphore (@notcom) to assist with both saving your SHSH Blobs locally on your PC and subsequently serving them up to iTunes rather than have them served up from Apple. The advantage to this is you can replay saved blobs and fool iTunes and your device into allowing you to restore a firmware which Apple is no longer signing.
This tutorial assumes you have never used TU before and your saved blobs are on Cydia, however it will work just as well if you have been using TU for a long time yourself. HOWEVER, I encourage everyone to follow the tutorial steps exactly as they have the added benefit of leaving both TU and your PC in the ideal configuration with which to save new blobs and avoid conflict with your hosts file or restoring stock firmware from iTunes. So again, I stress, everyone should follow all the steps at the beginning. It just helps get things straight...
First off, if you don't have it installed, you need to download the latest version from - The Firmware Umbrella - TinyUmbrella
The download is just an exe file for Windows and a dmg for OSX. TU requires Java, so if your PC does not have that installed you may also need to get that done...
Connect your iPad to your PC. If iTunes starts it is best to exit it immediately.
Now start TU and you should be presented with a screen similar to this...

On the connected devices list to the left you should see your iPad. Click on it. The panel in the middle will list your SHSH Blobs which are saved locally on this PC. If this is truly the first time you have used TU you will have a blank list like the one above. Otherwise you will see the blobs you already have saved.
Next, we need to update the TU settings so it will first retrieve our saved blobs from Saurik's Cydia server. To do this press the "Advanced" tab and untick all the options except the two shown in the following screen...

Now PRESS the "Save SHSH" button. You will see a spinner icon beside your iPad on the left. Wait till this finished then untick the "Request SHSH from Cydia" button so your screen looks like this...

Now PRESS "Save SHSH" AGAIN. This time TU will retrieve the latest blobs directly from Apple servers. This will cover any situation where Cydia may not have the latest blobs. It is also the safest configuration to leave TU in once you are finished with it, so do not make any further changes to the check boxes.
Now is the time to press the "Start TSS Server" button. TU will make the necessary changes to your computer to fool iTunes into thinking that TU is the Apple blob server. Once it is started, switch back to the main screen by pressing the "General" tab and you should see your blobs as follows...

As you can see, the list which I showed right at the beginning of this tutorial, which were the blobs saved on Cydia, are now downloaded to TU and are ready for use.
The one I am most interested in is 4.3.3 as the rest of this tutorial will be based on restoring that version, despite 4.3.5 being the current firmware (at the time of writing).
For the time being, that is all we need to do with TU. It will work it's magic in the background now! You can minimise it if you like, just make sure you do not accidentally exit it! If you do, start it again and press "Start TSS Server".
Restoring a previous firmware.
So, now that TU is running in the background we are able to restore any firmware which is in the list of saved blobs which TU shows. For this example I am choosing 4.3.3 as this is the golden firmware for jailbreaking....
First it is always best to put your device into DFU Mode in preparation for a restore operation. To do this, it must be connected to the PC. You hold the home and power buttons at the same time for exactly 10 seconds then release the power button whilst continuing to hold home. After about 15 seconds the device will enter DFU mode and will be recognised by your PC. During this period you MUST let the drivers install correctly. Do not unplug the iPad from your PC. It just confuses Windows and sometimes it is a challenge to recover from a failed driver install. If you need more assistance in getting into DFU mode, try our sticky on the subject here - http://www.ipadforums.net/ipad-hacking/27489-dfu-mode-dummies.html
As soon as you achieve DFU mode, iTunes should start automatically. If it does not, start it up and you should be presented with the following screen...

Dismiss the dialogue and then HOLD the shift key on your keyboard (option key on a Mac) and click the "Restore" button. This will prompt iTunes to ask you to provide a firmware file to restore. Navigate to the file you downloaded at the start of the tutorial (or already had prepared) as shown in the following screen...

iTunes will give you a warning, which you should accept by pressing OK...

The rest of the process should be seamless if you have followed the set-up instructions... iTunes will go through a series of procedures one after the other...


Finally, your iPad should reboot with the firmware of your choice freshly installed. It will still require an initial connection to iTunes as though it was just fresh from a new product unboxing, and after that you should see your iPad in iTunes to use like so...

That's It! You (hopefully) successfully restored your iPad.
Now you can exit TU. It's work is done. I mentioned earlier that the options we set are the ideal configuarion for TU and your PC. Why? Well when you exit TU now, your hosts file will be pointing as it should back to Apple, so if you ever want to install the latest and greatest firmware, you won't have a problem. You never need to edit your hosts configuration manually if you are going to use TU in this configuration from now on. Also, whenever Apple releases a new firmware, just start TU (there is no need to connect any device to it) click "Show All SHSHs" in the top left and then press "Save ALL SHSHs" in the top right. TU will then save the latest blobs from Apple for all your devices. Simple and effective!
Wait! I got an error!
If you happened to receive an error, such as an iTunes 1013, this indicates you have a 3G device and your baseband is out of sync with the version you are trying to install. The baseband of the 3G iPads have blobs too, however these use stronger security techniques that the standard IOS SHSH Blobs, so they cannot be saved and replayed. If you run into trouble, post a reply details of which iPad you have, which firmware you were trying to restore from and to, and if you can also post the version of your baseband, which can be found by going to General > Settings > About, and scrolling to the bottom where the heading is "Modem Firmware".
And remember you must use at least 5.00.08 of TU!
Last edited:
